
There’s something magical about the holidays, isn’t there? The warmth of the season, the joy of gathering with loved ones, and, of course, the irresistible aroma of freshly baked treats filling the air. If you’re looking to add a festive twist to your holiday platter, these mint chocolate thumbprint cookies are the perfect choice.
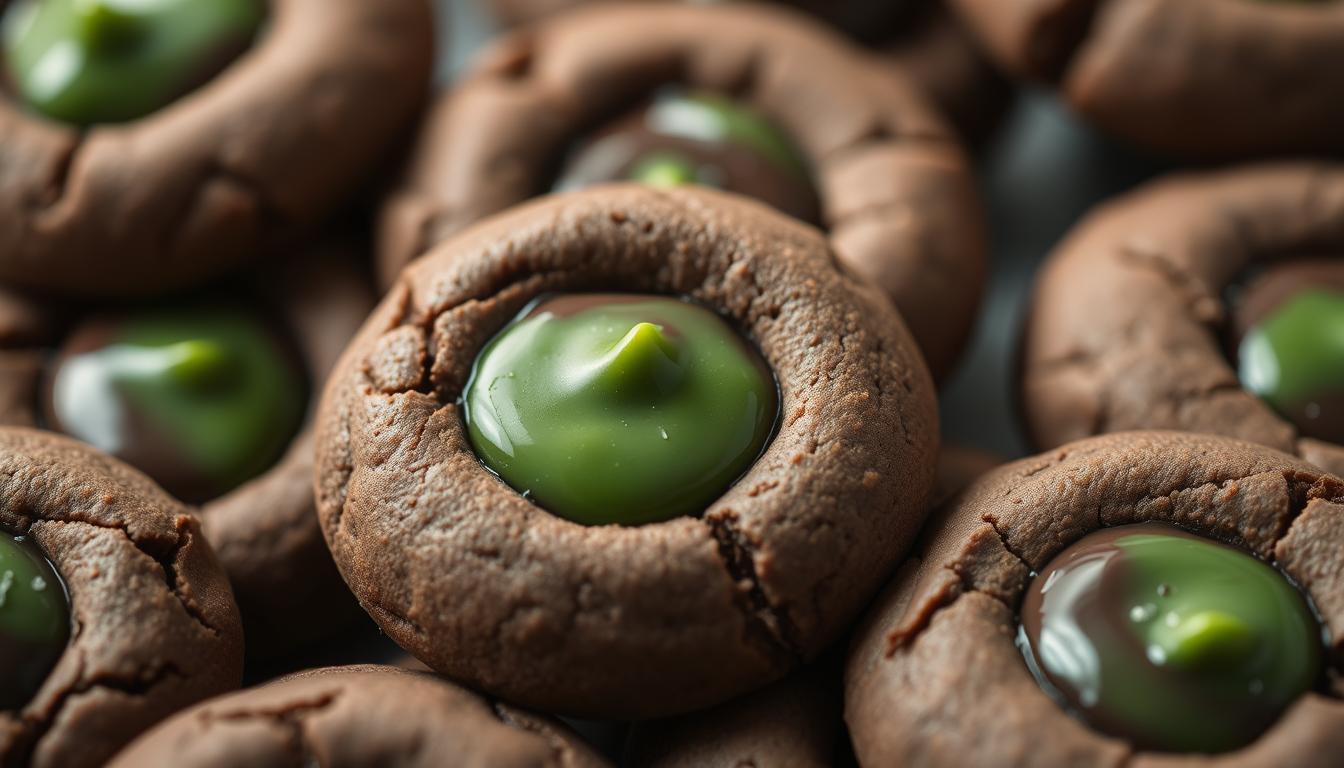
Combining classic holiday flavors with a modern touch, this recipe is both simple and impressive. With a soft, thick center and a rich chocolate peppermint ganache filling, these cookies are sure to delight everyone at your table. Best of all, the process is straightforward, making it ideal for bakers of all skill levels.
From mixing the ingredients to the final presentation, this recipe takes you on a delightful journey. Whether you’re a seasoned baker or just starting out, you’ll find the steps easy to follow. Plus, these cookies are a hit at holiday cookie countdown events, making them a cherished tradition in many homes.
Key Takeaways
- Perfect for holiday platters with a festive twist.
- Features a soft center and rich chocolate peppermint filling.
- Easy to follow for bakers of all skill levels.
- Combines classic flavors with modern presentation.
- A cherished tradition at holiday cookie events.
Recipe Overview and Essential Ingredients
Creating the perfect holiday treat starts with the right ingredients and tools. Each component plays a crucial role in achieving the ideal texture and flavor. From the softness of the dough to the richness of the filling, every detail matters.
List of Key Ingredients and Their Roles
To make the base, you’ll need flour, which provides structure, and sugar for sweetness and tenderness. Butter, softened to room temperature, ensures a smooth and creamy dough. A pinch of salt enhances the flavors, while extracts add depth to the taste.
Using a stand mixer or a simple bowl and whisk, you can combine these ingredients evenly. This step is vital for creating a uniform dough that holds its shape during baking.
Special Tools, Equipment, and Kitchen Tips
Having the right tools makes the process smoother. A silicone baking mat or parchment-lined sheet prevents sticking and ensures even baking. A tart tamper or wooden spoon helps create consistent indentations in the dough.
- Measure ingredients accurately for the best results.
- Space dough balls evenly on the sheet to allow for spreading.
- Chill the dough before baking to maintain its shape.
These tips and tools ensure your dough is robust enough to hold the filling. Understanding each ingredient’s role is key to baking success.
mint chocolate thumbprint cookies: Flavor and Festive Inspiration
Festive baking is all about combining timeless flavors with creative presentation. The holiday season is the perfect time to experiment with classic pairings that evoke warmth and joy. One such combination that never fails to impress is the marriage of peppermint and chocolate. This duo brings a refreshing yet indulgent taste that’s synonymous with the holidays.
Celebrating the Classic Chocolate-Peppermint Combo
The blend of rich chocolate and cool peppermint is a match made in holiday heaven. This pairing not only delights the taste buds but also adds a festive touch to any dessert. The thumbprint style enhances this experience by creating a perfectly defined center that holds the ganache filling. This design ensures every bite is a harmonious mix of flavors.
Traditional holiday baking methods inspire the design and taste of these treats. The precise bake minute technique ensures the cookies maintain their shape while achieving the perfect texture. This attention to detail makes them a standout addition to any holiday platter.
Holiday Traditions and Presentation Ideas
Presentation plays a key role in making these cookies a holiday favorite. Topping them with crushed candy cane adds a festive crunch and a pop of color. This simple yet creative touch elevates their visual appeal and ties them to the holiday spirit.
“The holidays are about creating memories, and these cookies are a delicious way to do just that.”
Here are some ideas to make your cookies shine:
| Presentation Idea | Effect |
|---|---|
| Crushed candy cane topping | Adds texture and festive color |
| Elegant platters for serving | Enhances visual appeal for parties |
| Pairing with hot cocoa | Creates a cozy holiday experience |
These cookies also fit seamlessly into the cultural tradition of holiday baking. They’re a reminder of the joy that comes from sharing homemade treats with loved ones. Whether you’re hosting a party or enjoying a quiet evening, these cookies are sure to bring a smile to everyone’s face.
Detailed Preparation and Baking Instructions
The key to flawless results lies in mastering the preparation process. Follow these steps to ensure your creation turns out just right. From mixing to shaping, each step plays a vital role in achieving the perfect texture and flavor.
Mixing the Dough and Incorporating Extracts
Start by whisking the dry ingredients in a bowl. Combine flour, sugar, and a pinch of salt. In a separate bowl, cream softened butter until smooth. Gradually add the dry mixture to the butter, mixing for about 2 minutes until the dough forms.
Next, incorporate the extracts to build the flavor profile. Add 1 teaspoon of vanilla and ½ teaspoon of peppermint extract. Mix thoroughly to ensure the flavors are evenly distributed. This step is crucial for achieving the desired taste.

Shaping, Indenting, and Chilling Techniques
Roll the dough into small, uniform balls, about 1 tablespoon each. Use a spoon or your thumb to create consistent indentations in the center of each dough ball. This will hold the filling later.
Handle the dough gently to prevent cracks. Place the shaped balls on a lined baking sheet. Chill the dough for at least 15 minutes before baking. This step ensures the cookies retain their shape and bake evenly.
Preheat your oven to the recommended temperature. Bake the cookies for the specified minute duration, checking for a golden edge. Let them cool slightly before adding the filling.
Mastering the Chocolate Ganache Filling
The secret to a rich and creamy filling lies in the details. A perfectly crafted ganache can elevate your dessert, adding a luxurious texture and depth of flavor. Follow these steps to create a smooth, glossy ganache that complements your baked goods beautifully.
Step-by-Step Ganache Preparation
Start by heating 1 cup of heavy cream in a small saucepan over medium heat. Avoid boiling; you want the cream just hot enough to melt the chocolate. While the cream heats, finely chop 8 ounces of high-quality baking chocolate. This ensures even melting and a silky consistency.
Once the cream is heated, pour it over the chopped chocolate in a heatproof bowl. Let it sit for a minute to soften the chocolate. Then, gently stir the mixture until it’s smooth and glossy. For an extra touch of holiday cheer, add ½ teaspoon peppermint extract. Be careful not to overdo it—this ingredient should enhance, not overpower, the flavor.

Customizing with Peppermint Extract and Candy Accents
Once the ganache has cooled slightly, use a spatula or spoon to fill the indentations in your baked goods. For a festive touch, sprinkle crushed candy canes on top before the ganache sets. This adds a delightful crunch and a pop of color.
Transfer your filled treats to a rack to cool completely. Let the ganache set for about an hour before serving. This ensures the filling holds its shape and provides the perfect texture.
| Customization Tip | Effect |
|---|---|
| Crushed candy cane topping | Adds festive crunch and color |
| Adjusting peppermint extract | Balances flavor intensity |
| Using high-quality chocolate | Enhances richness and smoothness |
“A well-made ganache is the hallmark of a truly indulgent dessert.”
By mastering these techniques, you can create a ganache that’s both visually stunning and delicious. Whether you’re baking for a holiday gathering or a cozy night in, this filling will leave a lasting impression.
Conclusion
Baking festive treats doesn’t have to be complicated—this recipe proves it. With clear instructions and simple steps, even beginners can create impressive results. Remember, a pinch of salt enhances the flavors, while mixing at the right speed ensures the perfect dough consistency.
From shaping to baking, every step is designed for success. Whether you use a stand mixer or mix by hand, the process remains straightforward. Feel free to experiment with minor variations, but stick to the core techniques for the best outcome.
Share your creations with loved ones and enjoy the festive spirit these treats bring. Happy baking!